
|
|
SPECIMEN PREPARATION AND METHODS Specimen preparation for microscopic analysis with a standardized method is highly recommended. Contents of This Section (All links are to subsections within this file.) Specimen of choice is the first-morning, midstream and clean-catch urine. For routine urinalysis, the specimen of choice is the first-morning miction. This choice is a compromise. For the chemical testing, the first-morning miction is usually the preferred specimen because it is the most concentrated but for the microscopic examination of cells: imagine cells incubated overnight in a 37°C urine. Cytologists prefer the second-morning specimen but, the aim of the tests is quite different. A free-voided specimen is often used, this being unavoidable for the emergency patient. The main disadvantage comes from the dilution of the specimen. This dilution, in some cases, can be sufficiently high to cause some false-negative results, especially with the chemistry testing.
The ideal situation is when the specimen is analyzed shortly after miction. But let's stay realistic! There will always be a certain delay between collection and analysis. It is important to set some rules for an acceptable period and conditions of conservation. What is an acceptable delay? This is an easier question to ask than to answer. While it is reassuring to have clearly determined delay rules, strict obedience to rules is undesirable, it all depends on the specific situation. Some decisions must be left to common sense. Before rejecting a specimen, we must consider the following:
Specimens that no longer represent the patient at the time of collection and those that could lead to false interpretation should be rejected. It should be remembered that these are an extreme situation. For several reasons, we think that all specimens should be analyzed. The specimen with a delay problem should have a mention as: "unacceptable delay: many results possibly invalid." The quality of a specimen, that cannot be analyzed rapidly depends on its conservation method. Several centers recommend that specimens be refrigerated if they cannot be processed shortly after collection. A major disadvantage with this practice is the precipitation of crystals. Amorphous urates are easily recognizable by the pink pellet they form upon centrifugation. In some cases, the precipitation is so abundant that it obscures all the elements rendering microscopic analysis quite difficult. A simple way to get rid of these urates is to place the complete uncentrifuged specimen at 37C (once centrifuged and decanted, it is often impossible to dissolve the amount of precipitate in the small remaining volume). When the precipitate is formed of phosphate, it can be dissolved by an incubation at 37C or by the addition of 1 or 2 drops of 2% acetic acid to the sediment. Adding a bacterial growth inhibitor to a specimen expected to be processed after a long standing period, would be of some help. Some of these substances (like those used with contact lens) can be added and dried to the wall of the container. The widely accepted urine volume is 12 mL. In a majority of centers, specimens are received in a graduated conical tube. The excess volume can be aspirated through a special device before centrifugation. In some cases, filling to the 12 ml mark is impossible. Some have suggested that the missing volume be completed with a suitable solution (normally saline). In some cases, a low volume should be used as is. Another problem with the unfilled container is whether to correct or not the results to a 12 ml volume. We prefer not to correct and add the mention to the report; "Results obtained with a .... mL specimen". The main reason for this choice is that it is not obvious that a count made from 6 ml of urine difficultly obtained from a urinary tract infected child would be doubled with a 12 ml specimen. This solution leaves the clinician with the opportunity to correct the values, if indicated. The recommended parameter for the urine centrifugation is 5 minutes at 400 RCF. The term RCF means " relative centrifugal force " and is dependent of the squared rotation speed (RPM) and the head's radius. In most centrifuge instruction manuals, a calculation nomogram is illustrated. This graphic is an easy way to calculate the correct RPM to obtain a 400 RCF. A speed of 1200 RPM is a representative example. Specimens must not be overspun. With compacted pellets, resuspension is more difficult, leucocytes and some other elements form clumps. These factors will give unevenly distributed slides.
Some recommend to keep a residual volume of 1 ml which gives a concentration factor of 12. We think that a concentration factor of 20 ( residual volume of 0,6 ml) is a good compromise. This choice increases the probability of finding some rare elements, like blood casts which are usually present in a small number. If the slide is too loaded, it is always possible to dilute it with a proper dilution fluid. It is frequent to have an unequal distribution of elements on the microscope slide. This is especially true for the leucocytes that have a tendency to aggregate. An inadequate resuspension can be the cause of an uneven distribution although, the presence of mucus, to which elements may adhere, can cause a significant variation in the different field counts. The resuspension procedure has to provide the better homogeneous distribution possible. The use of a vortex mixer at low speed is an efficient mixing method. Vortex mixing does not seem to disrupt the different urinary elements. With a well distributed sediment, examination of ten fields is often sufficient to obtain a representative average. It is highly recommended that the microscopic examination be done on a constant volume of sediment. Some companies ( Kova ...) propose special calibrated microscopic slides that always contain the same examination volume. The recent version of the Kova acrylic slide is: ready to use, has multiple wells, and allows examination under polarized light with the 40x objective. For those that prefer the usual slide and coverslip, an examination volume of 20 uL, with a coverslip of 22 x 22 mm, is well suited. With this coverslip size, 20 uL is the ideal volume preparation being neither too thick or too thin. The sediment volume is dispensed with a pipetting device. With an SMI(tm) type pipette that is used properly, carry over is not significant. The microscopic analysis report for routine urinalysis should be concise and clear. A heavy listing of elements must be avoided. We prefer the use of a grid report form designed so that reporting is resumed to making a check in the correct square. Checklist-style reports are easier to fill and easier to read. Cell count should be done at high power field (40X) while the cast count is done at low power (10X). Statland recommends the use of a unique graduation for all the elements. The proposed scale (0-2, 3-5, 6-10, 11-20, 21-100, >100) is practical and has a good discriminating power. This scale, with its few classes, is also well adapted to a computer system like the Clinicom. It is not easy to establish the microscopic urinalysis reference values for a single voided specimen. Some values are reported in Ringsrud and Linné (Urinalysis and Body Fluid). Many can be estimated from the Addis count and the Schumann cytodiagnostic method. Addis, over a 12-hour collect, has established the following: White Blood Cells < 1 000 000, Red Blood Cells < 500 000 , Hyaline casts < 5 000. From Schumann the following values were estimated:
One of the difficulties with the routine microscopic analysis is the number of samples to examine. Some labs use selection criteria, based on the aspect of the urine and the reaction of the dipstick (blood, protein, leukocytes), to eliminate some microscopic analysis. This operation allows an elimination of 40 to 60% of the microscopy depending on the center's clients and the activity of specialized clinics. Even after a first selection, there are still many specimens that can be classified as "ordinary". Real interesting specimens usually represent less than 4% of the workload. In such a context, it is difficult to forget the fifty undone specimens in front of a complex sediment. In this situation, it is normal to rush, and maybe not give enough time to the special sediment. To overcome this situation, we have proposed a three-level organization that we have called: phase I, phase II and phase III Phase I is a screening method. At this level, the usual microscopic results (WBC, RBC...) are estimated and reported. Depending of the screening results, the report is transmitted and the test ends, or the specimen is put aside for the phase II analysis. The selection criteria used are the following: Phase II selection criteria Dipstick The phase II step is a more sophisticated analysis. If needed, staining methods are used. Again, we are using selection criteria that command some specific actions. We have found that the system is more efficient if the phase II analysis is done by a different person or done by the same one, but only after all the phase I analysis has been completed.
The phase III level is something like the coordinated approach proposed by Schumann. Very special staining methods, like the PAP stain, can be used. This level is rarely needed for specimens issued from routine. It is also at this level that a specimen is transferred to specialized resources like the cytology or the parasitology department. |
|||||||||||||||||||||||||||||||||||||||||||
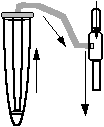 The
most efficient way to eliminate the supernatant is by aspiration.
It is relatively easy to construct a constant volume aspiration
device with a water siphon. The device shown here is efficient
and clean.
The
most efficient way to eliminate the supernatant is by aspiration.
It is relatively easy to construct a constant volume aspiration
device with a water siphon. The device shown here is efficient
and clean.